Watch the video and follow along!
In this first edition of Craftsman’s Corner, I’ll walk you through creating a basic leather flint and tool wallet. This piece will be a handy addition to your hunting or shooting pouch and allow you carry a few extra flints, some cleaning patch material, and a couple of basic cleaning/maintenance tools while afield or at the range with your trusted flintlock.
To complete this project, you will need just a few simple tools aside from the leather. A utility knife, an awl or stitching chisel, a couple of saddle needles, a few small binder clamps, and some waxed linen thread are really all that’s required, aside from the leather of course.
Let’s talk briefly about the leather. For this piece, I will be using a scrap of 3-4oz vegetable tan cowhide. You could just as easily use whatever you have on hand, such as bark or brain tan, prefinished oil tan, etc. I would avoid using a chrome tan hide, as the tanning agents can adversely affect your steel tools, potentially causing rust. The hide you choose to use is entirely up to you.
So, let’s get started! I have shown a photo of the pattern used here in Figure 1. You could easily modify the flap end to better suit your desired style, or even use a raw edge of the hide for a more rustic appearance. The piece could also be modified in size to better accommodate your needs. As mentioned, for this piece I simply grabbed a piece of hide from the scrap bin that would fit all the component pieces, but if using a larger piece of hide, you could simply cut a 4” strip, roughly 12” in length and then cut the four individual pieces from that. I would recommend using a dull pencil to lay out the pattern on your hide. In addition to the four primary pieces, you will also need a ¼” strip of leather, roughly 15” long for the wang, which will be used secure the wallet closed. Figure 2 shows the four pieces cut out, along with the leather wang for closure. Given that I am using veg tan hide here, I dyed the pieces using a commercially available Fiebling’s leather dye, as seen in Figure 3. You could also use walnut hull dye, vinagroon, or other, depending on the desired appearance.
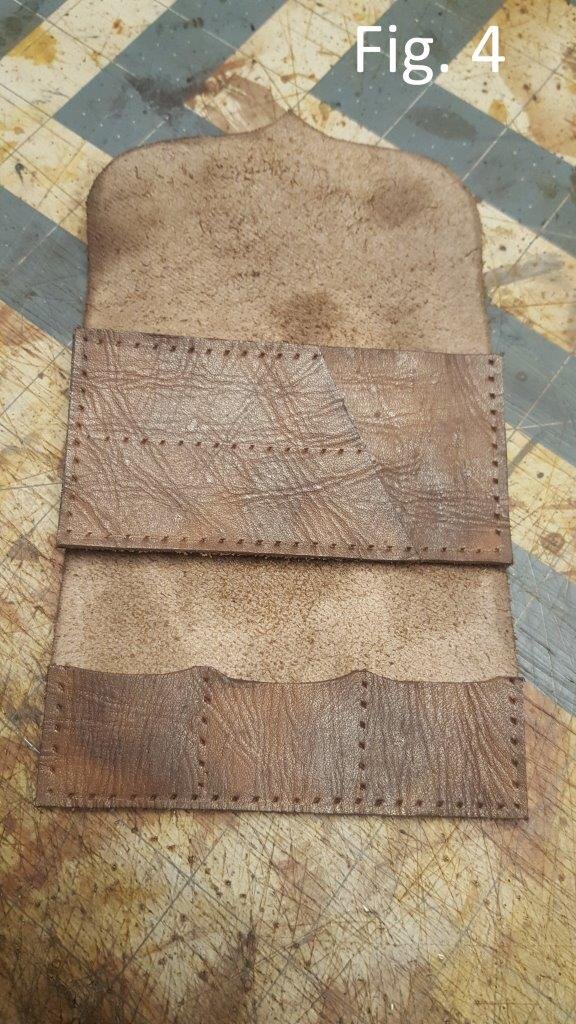
In Figure 4 you will see that I have pre marked the holes, roughly 1/8” in from the outer edge, that will allow the piece to be stitched together during assembly. Once marked, you can hold the pieces in place using small binder clips. Use your awl or stitching chisel to punch the holes through the layers of hide. I like to punch a couple of inches of holes at a time on longer runs, then stitch, which helps keep everything aligned as you go. In this case, and for almost all my leather projects, I will be using the saddle stitch, where two needles are used, one at each end of the thread. This stitch creates the most secure and durable means of holding pieces of leather together for years of service. This technique is done by passing both needles through the same hole and firmly snugging for each stitch. When you reach the end of the stitch run, simply back stitch two to three holes and clip the ends flush with the surface. If your new to sewing leather, there are several helpful YouTube videos out there that explain the stitching technique much better than words here can explain.
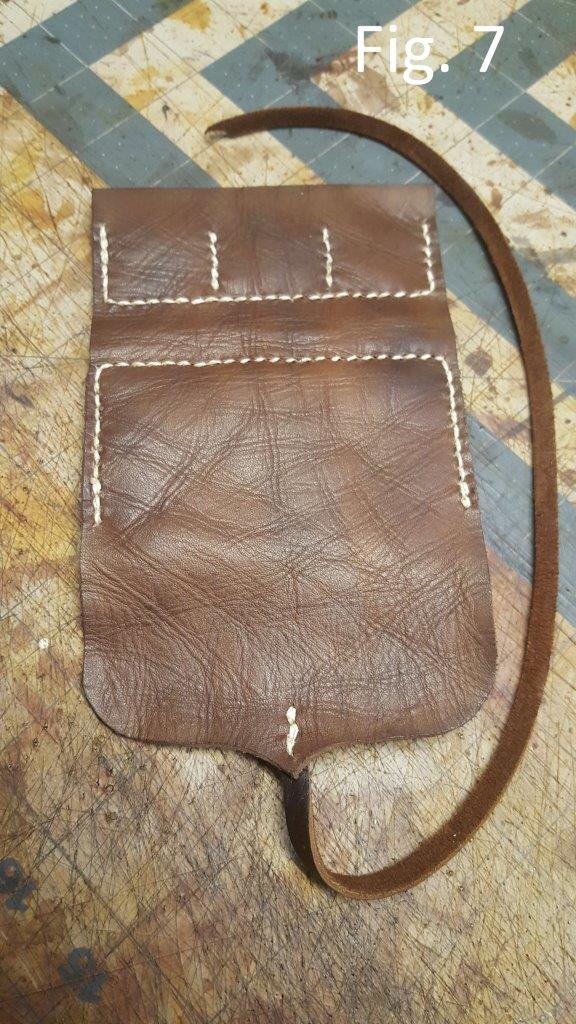
Time to start stitching! In Figure 5 you can see that I start by sewing together the two pieces that will make up the center pocket. Only stitching the two lines as indicated will allow you use the large pocket behind the smaller (angled) tool pocket for patching material, etc. Once that is complete, you can proceed to sewing on the pocket assembly as shown in Figure 6. Be sure to only sew the lines indicated, again to ensure that you can access the larger pocket behind the tool pocket. Once that’s complete, you’re ready to sew on the flint pockets. I like to space the inner stitch lines on these roughly 1-3/8” in from the edges, which creates three individual pockets approximately the same size. In this case, I have dropped the flint pockets down roughly ½” from the upper edge to allow for them to hold the flints upright in relation to the finished piece when in use. Once all the pocket stitching is done, you’re ready to stitch on the leather closure wang using three stitches in a row, with the wang placed centered under the flap, as shown in Figure 7. You will also see that on this piece I have slightly scalloped the upper edges of each flint pocket, which is completely optional and entirely up to you.
Well, there you have it! In a short period of time, and with minimal tools and supplies, we have created a very useful piece of kit that will likely outlast us all. The finished piece can be seen in in Figure 8. Hopefully you found the content here informative and useful, perhaps inspiring you tackle the project yourself at home! Thank you for following along!
Jeff “PoBoy” Luke
Find out more about the National Muzzle Loading Rifle Association at our website - NMLRA.org


