The Apprentice’s Notebook
Installing a Breechplug
By Jay T. Close, Kentucky
Introduction
A good measure of your rifle's safety, reliability and durability de pends in how the breech plug is installed. Fitting that plug is not a job to be taken lightly but it is how I usually begin a rifle. If I do a good job here, I can approach the rest of the rifle with confidence that the finished gun will be a safe one. If you're intimidated by this work, some manufacturers -- e.g. the Getz Co. -- sell barrels already breeched. You can be assured of this work. Also, if you buy a barrel and breech plug from Track of the Wolf, they'll install the plug for a modest charge. They too guarantee the work is done right. Nevertheless, the only way to learn to install a breech plug is to fit a few. Moreover, installing a breech plug is a very basic skill, certainly, one required of anyone aspiring to the appellation of "gunsmith". So, buy a barrel and a breech plug to match the barrel threads. You'll minimize frustration if you purchase one of the so-called premium barrels. These have the exterior of the barrel-shaped con centric to the bore and allow you to match the tang of the breech plug to any of the eight flats of the barrel.
Getting Started

Figure 1 shows a schematic of a common breech plug with its various parts named. When you buy a barrel and breech plug make sure that the threads of the two components match. Be careful here because the threads used for various caliber barrels have not been standardized. The thread sizes employed by G. R. Douglas Co. in the past are fairly common so I'll list those below:
.32 and .36caliber........9/16 x 18UNC
.40 and .45 caliber........5/8x 18 UNC
.50, .54 and .62 caliber.. ... 3/4 x 16 UNC
Also, make sure that the width of the breech- plug tang and height of the bolster will match the diameter of the octagon barrel you choose.
The height is most important, the width will fall into place. For those not familiar with the thread notes like "5/8 x 18 UNC" , I' ll try to explain. The "5/8" refers to the diameter of the threaded shaft, or the major diameter of the thread (Figure 2).

The number "18" tells the number of threads per lineal inch. You can have a threaded shaft 12 inches long or 1/2 inch long, but a 5/8 x 18 thread will still have 18 threads per inch. Eighteen threads per inch has a couple of consequences. First, to screw a 5/8 x 18 threaded shaft forward one full inch, the shaft will have to revolve 18 complete revolutions. Second, for each complete revolution, the shaft will move
forward (or back) 1/18 of an inch. A machinist or engineer would say the thread has a pitch of 1/8 inch or about .056 of an inch. This is all simple geometry and you can easily figure similar consequences for any known thread size.
Finally, "UNC" stands for Unified National Coarse. This is a standardized set of thread sizes rec oganized throughout the United States. Unified Nation Fine (UNF) is another common series in this country; and then, of course, metric threads....you can look that up for yourself! Seriously, there's a lot more to know about threads (e.g. class of fit, left hand threads, thread forms), but if you remember that the first number in a common thread note refers to the diameter of the threaded shaft and the second number to the threads per inch, you'll be in good shape.
To breech your barrel, you need to install the plug to fit three sur faces precisely. Most important for the safety of your rifle is the fit of the breechplug face. This must bottom tightly in the threaded portion of the barrel. Any gap there will collect powder fouling, harboring sparks and corrosion. See Figure 3.
Second, at the same time the face of the plug bottoms in the barrel threads, the face of thebolster must screw tightly to the back of the bar rel. Any gap here will be obvious on thefinished gun and detract from its appearance (Figure 3).


Third, the breech plug tang must align with one of the flats of the octagon barrel (Figure 4).
If you have a "premium" barrel, the tang can align with any convenient barrel flat, but if you have, for example, a standard Douglas barrel the outside of the bar rel is not parallel to the bore. Douglas measures the "runout" (the deviation from parallel) and stamps their company name on the fl.at nearest the bore at the breech. If you position that flat at the bottom of your barrel inlet, you can then make accuracy adjustments easily with the height of the sights.

This means, however, that the tang of your breech plug can align with only one flat of the barrel: the one opposite the flat with the name stamp (Figure 5). This is trickier than it might seem. The alignment will be facilitated if the bolster and tang of the breech plug you buy are slightly wider than the width of the barrel Oat. If, for example, the barrel is 7/ 8 inches across the flats at the breech, buy a plug for a 15/16 inch barrel. Any slight misalignment can then be filed to fit.
Tools
In addition to a workbench and sturdy vise, these are the tools and materials I have on hand when breeching a barrel:
10 inch mill file with handle. 9 inch adjustable wrench.
4 inch machinists' try square. vernier caliper with depth gauge. scriber.
10 oz. hammer.
3/4 inch countersink fitted in a brace.
1/4 inch cold chisel.
machinists' layout blue (Dykem blue). file card.
brass jaw covers for the vise.
brass strip to protect breechplug from wrench.
light weight oil (3-in-l oil). Q-tips.

This list should be largely self explanatory. The jaw covers for my vise were bent from scrap brass less than 1/16 inch thick. Use what you have available and bend them to suit your equipment. The pad for the breech plug itself is a strip of 1/ 16 inch brass 3/ 4 inch by 2 I/2 inch bent into a "U” as in Figure 6. When placed between the breech plug bolster and the jaws of the wrench it protects the sides of the plug and tang. Make sure that the shape you bend allows the brass to lie close to sides of the bolster.
Filing
First, measure the depth of the threading in your barrel -- a vernier caliper with depth gauge helps, or just use a small pocket ruler. Often times, barrels are threaded 5/8 or 3/ 4 inch deep: too deep for our pur poses. Unless you're contemplating building some sort of cannon, file the breech of your barrel until only slightly more than 1/2 inch of threading is left -- say, about 17/ 32. This amount of threading is plenty strong and by keeping the breech plug fairly short you aid the design of the lock and wrist region of the rifle. But more on that in the future. If you have much material to re move, start filing with a big, coarse, double cut file until you're near the finished size. Then, switch to the finer 10 inch mill file. Accurate fil ing comes with practice, but it helps to have the workpiece clamped se curely about elbow high for this type of work. Take an easy Stance with one foot slightly forward and file with long, smooth strokes. One hand will grasp the file handle (always have handles on your files) and the other hand will lightly grasp the tip of the file.

As you begin a file stroke, the front hand exerts downward pres sure. Slowly, that pressure will transfer to the rear hand. The net result is that the center of pressure will always be directly over the workpiece as you file. This is what allows you to file flat (Figure 7).
On the return stroke, lift the file from the work. Don't drag it back across. Imagine
yourself filing just in the very center of the workpiece - "aim" for that spot. This will also
help you file flat. Stop work occasionally and check your progress. Rotate the barrel in
the vise so you are coming at the work from a dif different angle. This is another trick
that will aid flat filing.


Check progress frequently with the depth gauge and test the breech of the barrel with a try square. The area you're filing must be absolutely flat and perpendicular to the
threaded hole in the barrel. If the barrel is par allel sided, this is easy to determine.
Just place the try square body on one of the barrel flats with the blade on the breech. Stoop
down to get a close look at your work (Figure 8). Check the breech area for flatness from
at least two barrel flats 90 degrees from each other as indicated in (Figure 9). Correct any
deviations from square that you find.

Testing the breech face of a swamped (tapered and flared) barrel is a little
trickier. Set the body of your try square on the breech face and slide the blade up to one
flat of the barrel. The blade will stand from the barrel the same amount on all flats if
the breech face is square and flat. (Figure 10 shows the idea.)
Sometimes, if you're having trou ble keeping the breech face flat, short reciprocating file
strokes can help. Grasp the middle of the file with hands about 3 inches apart. Set the file
firmly on the breech so you can apply even pressure with both bands. Then work the file back
and forth using strokes about 1 inch long. This technique can be espe cially good if
you've filed a slight crown or high spot on the barrel and need to level it. Whatever it
takes, get that breech face flat, then countersink the ends of the threads about 1/16 inch.
Next, measure the length of the threaded shaft of the breechplug. File its length to match the
threads in the barrel: a bit more than 1/2 inch. Check your work often. Keep the face of
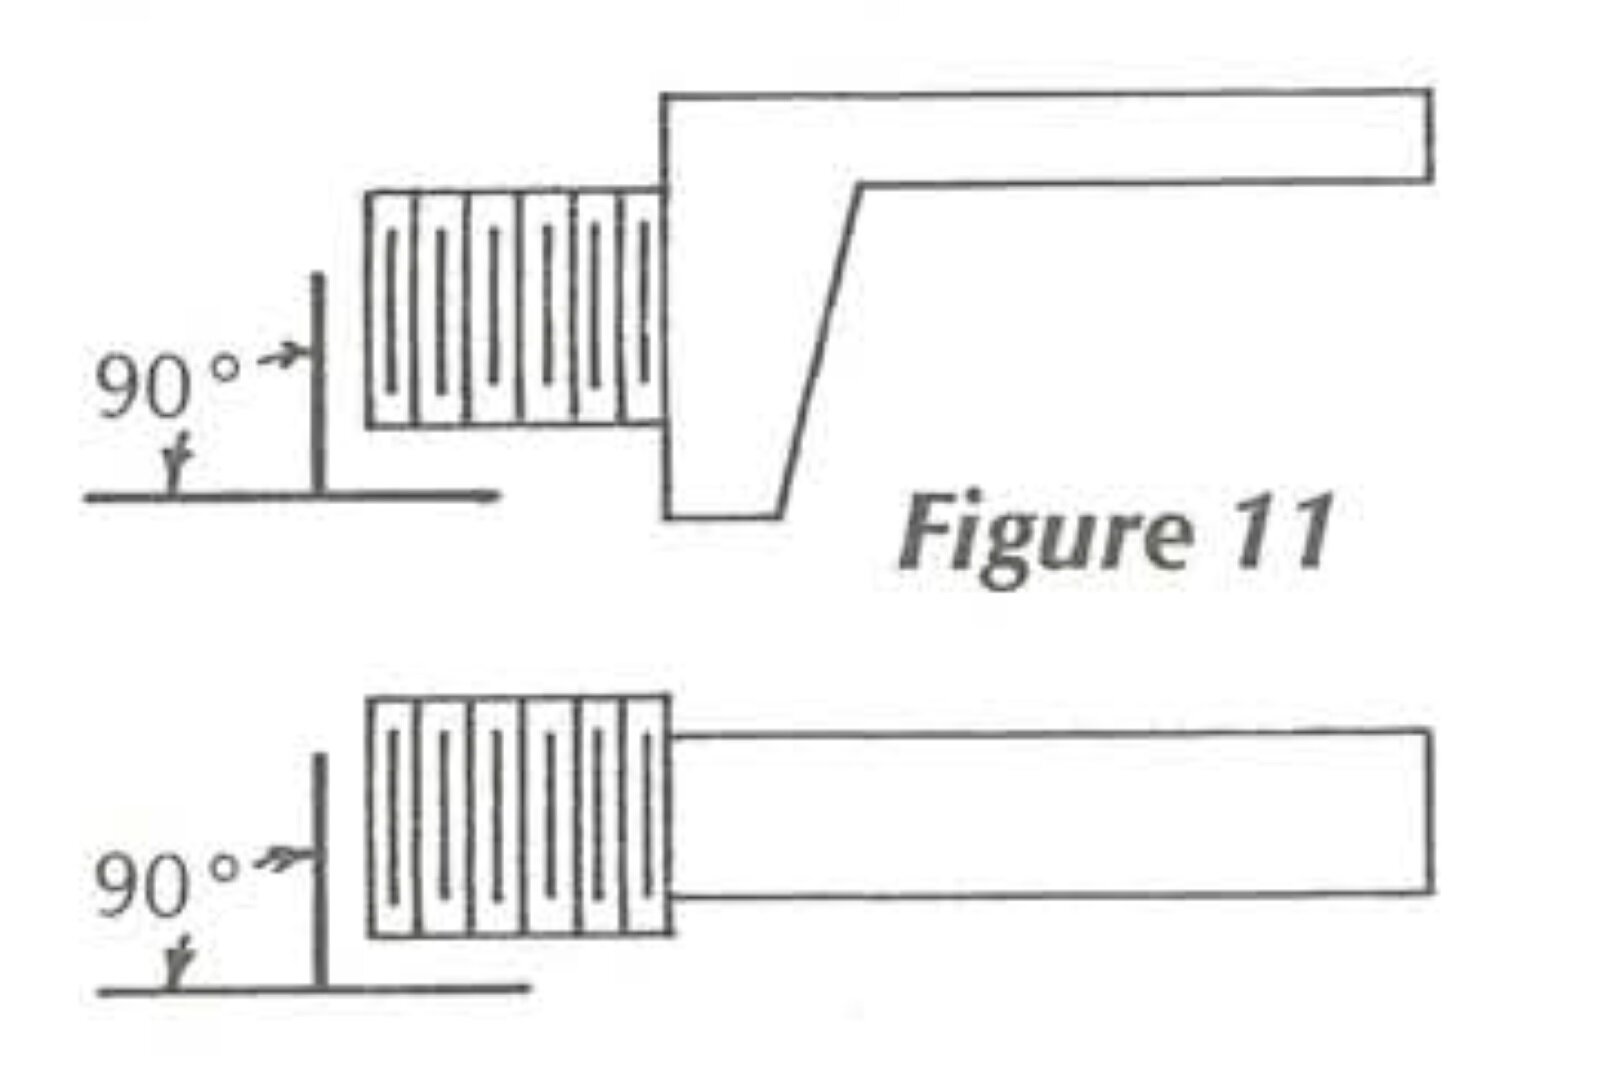
the plug flat and perpendicular to the run of the thread (Figure 11). The try square will
Be your guide.
When the plug length seems to match the barrel threads, file a chamfer on the end
of the shaft at about 45 degrees. Hold the plug up right in the vise by its bolster and

cant the file at the appropriate angle. Then, walk the file around the circumference of
the shaft end taking Jong strokes. (See Figure 12.) All you really need is a chamfer about
1/16inch wide.
Like what we’re doing? Find out more about the National Muzzle Loading Rifle Association
Muzzle Blasts on Instagram NMLRA on Facebook
The NMLRA and Muzzle Blasts have been an authority on muzzleloading since 1933. This article was not sponsored or paid for, we feel it is our job to bring you the most up to date news as possible on the world of Muzzleloading, be it living history, competitive shooting, or hunting